I Wrote An Aimbot Using Computer Vision
by notaswe
I built an Aim Trainer in Python earlier this year. Problem is, my aim is bad…so I decided to cheat.

Aim Trainer
Before we jump into the details about how I used computer vision, specifically OpenCV, it is important to understand how the aim trainer works.
- Player starts the game
- Countdown begins
- Red squares are spawned one at a time, randomly placed in playing field
- Player clicks the randomly spawned target, removing it from play and incrementing score
- Score decrements if the player misses a target
- Once the countdown finishes, score is calculated and displayed to player
Here is a video of the game being played with a countdown of five seconds; the sound effects should help to drive it home.
It should become immediately obvious that:
- I got incredibly lucky with the spawn of the first target
- I am not very fast at aiming with a mouse
Enter OpenCV
If you have ever delved into the world of computer vision you are likely already familiar with OpenCV. That said, it is available as an import in Python and makes cheating in my aim trainer significantly easier. When I set out to achieve my goal, my thesis was this:
- Since the red square is, well, red, OpenCV could be used to quickly read the screen for RGB values of (255, 0, 0) or similar
- I could then draw a green square around the area of interest, which would essentially be a pygame.Rect in my game
- Finally, I could immediately jump the mouse cursor to the center of the pygame.Rect
Modifying the Aim Trainer Code
If you look at the Aim Trainer code you will notice the following .py files:
countdown.py
main.py
postgame.py
settings.py
target.py
title.py
As a budding video game cheat developer, I decided to be as inconspicuous as possible and fork the repo. New file list as follows:
aimbot.py # nothing to see here
countdown.py
main.py
postgame.py
settings.py
target.py
title.py
Of course, aimbot.py actually needed some code in it to do anything. A few quick imports:
from settings import *
import cv2, io, pygame
import numpy as np
This includes data from my local settings file, OpenCV (cv2), input/output to store a screenshot, pygame to deal with rectangle(s), and numpy for a variety of RGB value-related tasks.
Aimbot Class
I then created class called Aimbot with the following __init__ function:
class Aimbot():
    def __init__(self):
        self.display_surface = pygame.display.get_surface()
        self.target_identified = False
        self.contours = None
        self.detectedX, self.detectedY = None, None
display_surfaceis used to read/write to the displaytarget_identifiedis a boolean that is used to decide whether or not to run detection functioncontoursis set toNonewhich works in tandem with the above booleandetectedXanddetectedYare set toNoneat first but will be changed when a target is detected
Update Function
If you are familiar with Pygame and/or general game development, you will likely be familiar with what an update() function might do. If not, a quick explanation:
- Games run in units called frames, often-times fixed at 60 or 120 per second
- Regardless, certain things need to happen every frame
- In this case we need the Aimbot class to have an update function
- This function will check if a target has been identified via the
target_identifiedboolean - If
target_identifiedisFalse, the yet-to-be-discusseddetect_target()function will run - If
target_identifiedisTrueandcontoursis notNone, outlines will be drawn around the coordinatesdetectedXanddetectedY
    # "Read" display every tick and identify/highlight target.
    def update(self):
        if not self.target_identified:
            self.detect_target()
        elif self.target_identified and self.contours:
            self.draw_outline(self.detectedX, self.detectedY)
Draw Outlines Function
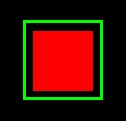
Assuming a target has been identified, a simple draw_outline() function can take in x/y coordinates, create a surface based on a DETECTION_IMAGE which, well, is just a green square with transparency where the assumed target will reside.
    def draw_outline(self, x, y):
        if x != None and y != None:
            detection_surface = pygame.image.load(DETECTION_IMAGE)
            detection_rect = detection_surface.get_rect(topleft=(x - 40, y - 40))
            self.display_surface.blit(detection_surface, detection_rect)
        if pygame.mouse.get_pressed()[0]:
            # Jump mouse to detected target
            pygame.mouse.set_pos(x, y)
The result looks something like this:

And with that, the detection coordinates can be used to jump the mouse cursor directly to the center of the green square.
Reset Detection Function
If you’ve gotten this far you might be asking…okay, so how do we detect the target? One final boring function to discuss before we get to the good part:
    def reset_detection(self):
        self.target_identified = False
        self.contours = None
        self.detectedX, self.detectedY = None, None
Once the cheat…err, player clicks on the detected target, the result of the detection needs to go back to its original state. The above variables are set to what they were during the __init__ function.
The Good Part (Detect Target Function)
This function is a little wild, so let’s walk through it. First, screen_copy is used to get information about what is currently on the display. Several changes to its value ensue:
- RGB values are inversed
- The array is rotated 90 degrees
- The array is flipped upside down
- The array is flipped horizontally
def detect_target(self): screen_copy = pygame.surfarray.array3d(self.display_surface) screen_copy = cv2.cvtColor(screen_copy, cv2.COLOR_BGR2RGB) screen_copy = np.rot90(screen_copy) screen_copy = np.flipud(screen_copy) screen_copy = np.fliplr(screen_copy) _, buffer = cv2.imencode('.jpg', screen_copy) file_bytes = io.BytesIO(buffer) find_target = cv2.imdecode(np.frombuffer(file_bytes.getvalue(), np.uint8), cv2.IMREAD_COLOR) hsv_image = cv2.cvtColor(find_target, cv2.COLOR_BGR2HSV) lower_red = np.array([0, 50, 50]) upper_red = np.array([10, 255, 255]) mask = cv2.inRange(hsv_image, lower_red, upper_red) self.contours, hierarchy = cv2.findContours(mask, cv2.RETR_TREE, cv2.CHAIN_APPROX_SIMPLE) for cnt in self.contours: # Get the rectangle bounding contour [x, y, w, h] = cv2.boundingRect(cnt) aspect_ratio = float(w) / h area = cv2.contourArea(cnt) if (aspect_ratio >= 0.9) and (aspect_ratio <= 1.1) and (area > 100): # Draw the rectangle on the original image cv2_rect = cv2.rectangle(find_target, (x, y), (x + w, y + h), (0, 255, 0), 2) detection_surface = pygame.image.load(DETECTION_IMAGE) detection_rect = detection_surface.get_rect(topleft=(1860 - x - 10, y - 10)) self.detectedX, self.detectedY = (detection_rect.centerx, detection_rect.centery) self.target_identified = True screen_copyis then used as an input parameter to encode the screenshot to ajpgfiletype, get this as bytes, and then decode it in a manner that allows OpenCV to read the colors in the image. A variablehsv_imagethen uses the result to store the image in Hue, Saturation, Value (HSV) format.lower_redandupper_redare then declared which will be the lower and upper accepted RGB values of the color red. A mask is created with thehsv_imageand the two color boundaries.- Contours are then found which are areas of the screen with similar colors and are stored in the
contoursveriable originally initiated toNone. - Finally,
contoursis used to find the area of interest and adetection_surfaceis created so the bounding green square can be drawn in the correct location.
Final Steps
Unfortunately aimbot.py doesn’t just work its magic by existing; I had to make a few modifications to main.py and countdown.py to allow the functionality of the Aimbot class. I’ll let the results speak for themselves:
Thank you for reading!
tags: